Connecting remotely to your computer in some tough situations can be very helpful. There can be several reasons for it. Being able to connect to your computer remotely is always helpful. You can connect remotely and download a document that you don’t have currently with you. You can even help your friends to solve the issue that they might be facing. There are plenty of reasons you would remotely want to connect to your desktop. Well, you are at the right place. Here is our guide on How to share your Ubuntu Desktop.
Also Read: How to Access Your Windows PC from an Android Phone
Sharing your Ubuntu desktop
You can share your Ubuntu desktop by either of the two ways. One is the official solution provided by Ubuntu developers itself. While the other option involves downloading a third party piece of software called xRDP. But for the most part, this software is not very stable. You might feel a bit frustrated due to general graphics based problems and mouse issues. The graphics issues come into the picture because Ubuntu has now started using the Gnome desktop by default. You can try another Desktop but that might be too much work for what we are trying to achieve.
The way Ubuntu puts it, the process is really easy to follow. The tricky catch here is to try and access your desktop from somewhere else other than your home network. Our Guide will help you connect remotely to your computer. We have included specific points for connecting using Windows, Linux, macOS and Mobile.
Starting up the process
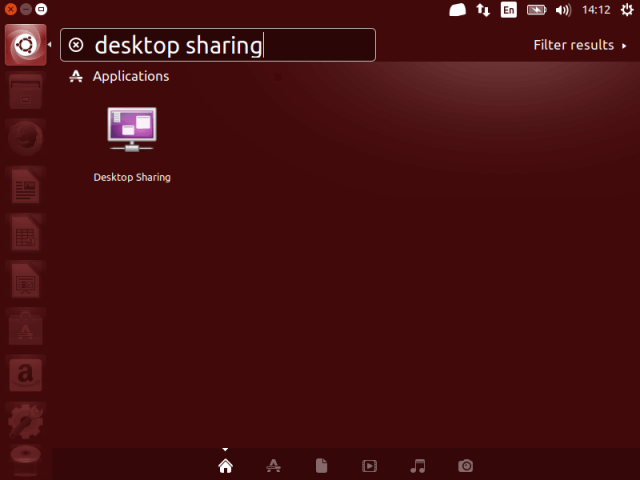
Search your Ubuntu machine for “Desktop sharing“. You can search in Ubuntu by pressing Alt + F2. Once you see the Desktop sharing option, click on it to open the menu.
Setting up Desktop Sharing
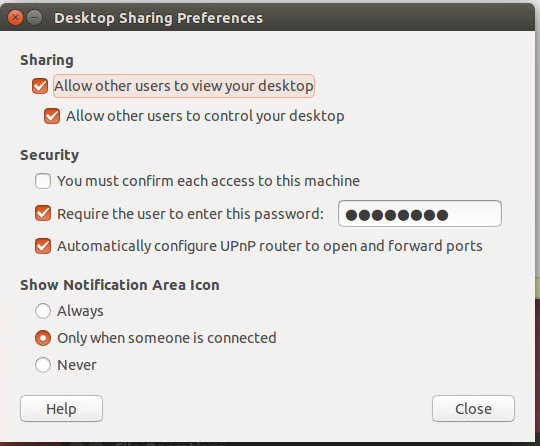
The Desktop Sharing window will have three tabs:
- Sharing
- Security
- Show notification area icon
Setting up sharing option
- If you want to share your desktop with other users but don’t want them to make changes. Check “Allow other users to view your desktop“.
- If you wish to grant total access to the other person. Check “Allow other users to control your desktop“.
- You should never allow somebody whom you don’t know to take control of your desktop.
Setting up Security option
- If you want to setup your desktop such that other people can connect and see your desktop, select the first option. It says “You must confirm each access to this machine“. You can check this option to share your desktop screen with people by granting them permission.
- If you want to connect to your computer yourself from somewhere else, make sure the first option is unchecked. Always set up a password to ensure that no unauthorized user can see your desktop.
- The third option lets you access your computer desktop from outside your home network. The default setting will allow only requests via your home router. In order to connect to outside router your home network router needs to open a port. This port will be used to send and receive data among the two networks. For this, you can tick “Automatically configure UPnP router to open and forward ports“.
Setting up notifications options
- If you select “Always”, the notification icon will appear in the notification bar reminding you that Desktop Sharing is active.
- If you choose “Only when someone is connected“, the icon appears when someone else is viewing your desktop.
- The third option “Never” pretty much explains itself. It will never show the icon.
Taking a note of your IP address
Before connecting to your computer from somewhere else you need the address of your computer. If you are connecting to your machine from another machine in the same network than you would require internal IP. In other cases, you would require the external IP address.
Get your Internal IP address
Open the terminal window. Press ALT + T. After terminal is open, just type “ifconfig“. This will open up a table with different access points. If connected directly through a cable, you need to look for “ETH“, Furthermore if you are connected wirelessly than search for “WLAN0” or “WLAN2S0“. The option varies depending on network card used.
Within your respective blocks of text, look for “INET“. This should be your Internal IP address.
Get your External IP address
Open a web browser on your machines such as Firefox or Google. Now type “What is my IP”, Google will return with your external IP address. Take a note of it.
Connecting from Windows to your Ubuntu desktop
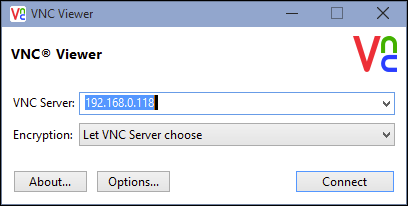
In order to be able to connect from Windows, you would be needing external software. You need to download VNC client. There are lots of clients available online to choose from. Install the software and we are good to go. Make sure that your machine running Ubuntu is up and running.
In the VNC address field type in your internal IP address. Hit enter and it will open up a password prompt. Enter the password which you created in while setting up desktop sharing. If everything goes right, the Ubuntu desktop screen should reflect on your computer.
You can connect from external addresses by using your external IP. Make sure you have opened external ports to be able to connect via external addresses.
Connecting from Mobile
Connecting to Ubuntu desktop is pretty much an easy process. You can download VNC viewer from the Google Play Store if you use an Android phone. Open the app after it is installed and enter the IP address of your machine giving it a name. You need to enter Internal or External IP address depending on the location you are accessing your desktop from. Save the configuration. Click on connect option for the machine you want to connect to. If your machine is online, you should be able to access Ubuntu Desktop on mobile.
How the application behaves will always depend on the hardware of the device. So it can be a hit or miss situation depending on different factors such as internet speed, Bandwidth and the hardware supporting it. We hope that this guide helps you to connect and share resources from your Ubuntu Desktop.


