Things You Need to Know Before Starting Raspberry Pi Project

Every day we see on the web and social networks how many people do different things with Raspberry Pi and everything seems fun and simple. Now you want to do your own project and have fun in the process, for this you may have purchased or are thinking of purchasing an Arduino card, Jumpers cables, some LEDs, maybe sensors and accessories or even kits. However for you to make sure you have a good time of fun here we will give you some tips to keep in mind, and what we hope will save you time and frustration along the way.
Here are 10 Things you need to know before starting Raspberry Pi project:
1. Arduino Boards
Arduinos lend themselves beautifully to small, dedicated tasks. The Arduinos are like an experimental and extended version of what you would find for example inside a smoke detector. The microcontrollers in these types of applications have a short list of tasks, it is usually not necessary for example that a thermostat has the power to run Linux or make large calculations. If your intention is to write code for applications that run/run in some operating system, then we recommend you think of a Single Card Computer or SBC (Single Board Computer) such as Raspberry Pi, Beagle Bone or Intel Edison.
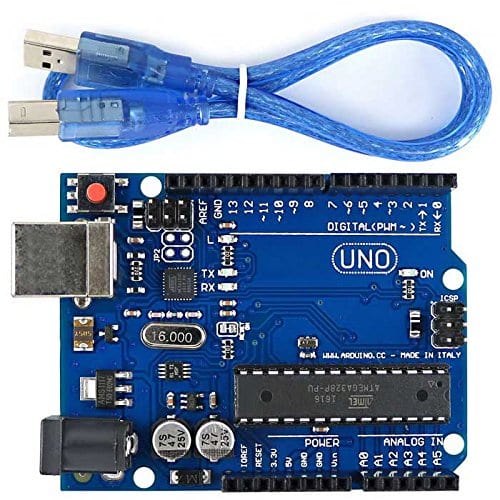
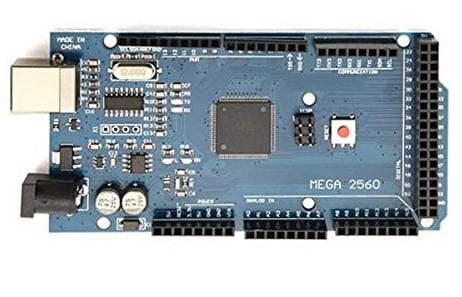
Keep in mind that although all Arduino cards are portable, there are some cards that can be better suited to this type of project due to their built-in wireless system features, special ports, size and low consumption. of energy, some examples are: Digispark, Arduino Nano, Arduino Mega 2560 ADK, Arduino Uno Wifi, Intel Edison, among others.
2. Writing Code
The programming of the Arduino cards consists of writing a “Sketch” in the Arduino development environment (Arduino IDE) and uploading it to your Arduino card.

These sketches are written in C language and therefore the sketches use the same control structures. If you do not understand what I mean, do not despair, it’s good news. This means that if you know something about C or C ++, writing sketches or sketches will be very familiar. If you do not know anything about C or C ++, it means that learning to write sketches or sketches will help you learn the basics of C. That is, you win in any way.
A note about the Arduino development environment: it does not have a debugger built into it. If you are used to repairing or fixing code with debuggers integrated into other development environments, for example as ATMEL Studio or MPLAB, then with Arduino IDE, you just have to be ready. You will have to use more primitive methods to solve problems, such as inserting a line of code to return some text or activate an LED when you have reached a section of code that you are evaluating, i.e. be creative and create test points or testing within a code. The lack of a debugger can be seen in two ways, the positive side is that it will help you develop your problem-solving skills, however, the less positive side is that it can be counterproductive to locate and correct errors if your code is too extensive.
3. Use the right tools: Cards, shields, modules and accessories

You probably bought or plan to buy an Arduino card because you have a project in mind and/or want to learn more about electronics. It will be much harder to learn if your learning materials have little documentation and support. You must concentrate on the lessons and concepts, not at problems with cards, shields, modules, accessories, etc. of unknown origin and/or without documentation or scarce references. If you use cards, shields, modules and accessories of the Arduino brand or of recognized manufacturers and distributors, you will be more likely to find a solution to a problem that may arise or to someone who has previously had the same problem.
In general, serious and professional manufacturers and distributors, regardless of the respective guarantee, can guide you because they have the necessary documentation or have a tutorial or video tutorial, even if you contact them, they probably will not do the task but they can give you insights on how to detect or solve a problem because they usually know very well the products they manufacture or distribute.
By the way, problem-solving is an important and unavoidable part of the trip, but you should not increase it when you are starting.
4. Keep notes about what you do and about your evolution
This is especially important as you experiment with different iterations of the same program. It will be very easy to lose track of which version did what, and why. You may think that you will not need these revision notes, but I assure you that you will. The number of changes and iterations that you can do during a weekend trying to get a project at its right point could reach hundreds. If you want to do it in a professional way you can learn about new simple tools to manage, open source, free and very useful as GitHub.

It is also important that you keep a record of the connection schemes you make. On the web, there are different tools to draw circuits like open source, shareware, pay, etc.
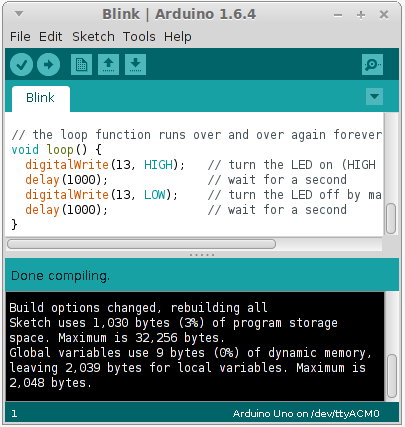
5. Go step by step without jumping steps

Become a master of individual techniques and concepts first. Start by blinking the LED on the Arduino card using the “Blink” example included in the Arduino IDE. Then, flash an external wired LED to an output of your card. This is the “Hello World of Arduino”. Then, write a sketch to flash several LEDs at the same time. Then, make the LED or the LEDs only blink when you press a button. Next, he elaborates a sketch that is, a sketch + scheme of the circuit, which makes an analogue reading of a potentiometer to control the speed of the LED or the LEDs flashing.
Any project that you ultimately want to achieve is reducible to smaller tasks. For example, by putting small jobs such as deciphering the press of a button, sending data to an LCD screen, reading a temperature sensor and flashing an LED, together they could lead you to create a macro project as a “controlled temperature switch”.
6. Beware of: the maximum limit of the clock speed and 8-bit, 16-bit and 32-bit mics.
As an example, the Arduino UNO has an internal clock speed of 16 MHz. That’s 16 million clock ticks per second. That sounds like a lot, but consider the following: Each instruction or check in a sketch uses clock signals. The more tasks and instructions your sketch has, the faster it will consume that seemingly endless surplus of clock cycles; and before you know, surprisingly, the Arduino will be missing input signals or pulses from the output. This means that the Arduino literally does not have enough time to do everything that is expected of him as scheduled/uploaded. Do not panic!! This also happens to the most powerful computer in the world.
For basic tasks, this will rarely become a problem, but as your projects grow you will find it. The ceiling or top of the clock speed really becomes evident when you start trying to control motors step by step or when handling the feedback of the encoder of the servomotors.
If you anticipate that you may be outside of the clock cycles set in Arduino UNO, then you should start thinking about another type of Arduino card whose watch has a wider range. For example, Arduino Due runs at 84 MHz, Intel Edison runs at 100 MHz or on other platforms such as ChipKit, Mbed, etc.
Arduino Uno’s Specification
The Arduino Uno brings the ATMEGA328P-PU Microcontroller which is an 8-bit microcontroller. If the microcontroller is 16 bits or 32 bits because the widths of the registers will have 16 bits or 32 bits respectively. But what does it have to do that is of greater or lesser number of bits? The answer is greater accuracy. The greater the number of bits, the mathematical operations will be more precise. On the other hand, a 16-bit microcontroller can automatically operate two 16-bit numbers, such as the definition of an integer for language C 2 ^ 16 = 65536 or from -32768 to +32767. But when using an 8-bit microcontroller, the process is not that simple. The functions implemented to operate such numbers will take additional clock cycles.
Depending on how the code of your application is processed and how many calculations you make within it, it could affect the performance of the application you created. Also when operating whole numbers (int), store them, etc. you will be consuming more records in RAM, EEPROM, etc. in an 8-bit microcontroller than in a 16-bit microcontroller.
An example of a board with 16-bit micro is MSP-EXP430G2 Launchpad. Examples of cards with 32-bit microphones are MSP432 LaunchPad, Arduino DUE, Intel Edison, ChipKIT uC32, ChipKIT MAX32, Core F446RE, Discovery STM32F407, etc.
7. Learn how to use the Arduino Libraries
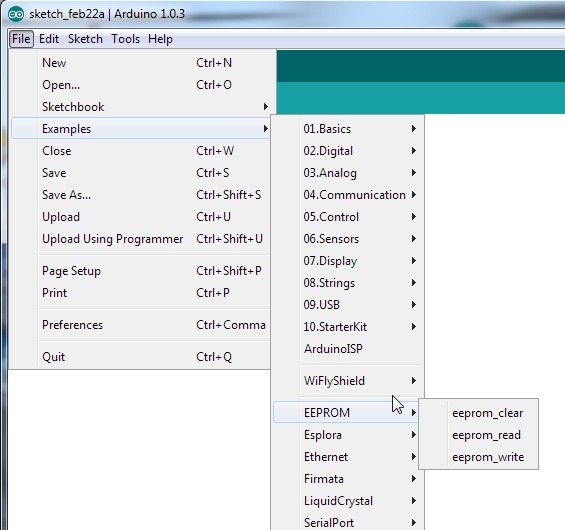
What happens if large sections of the code you need are already written and available? Would not that really speed up your time and reduce your work to complete the project? Well, that code is out there and it’s just waiting for you to catch it and load it into your sketches or sketches. These collections of code are called Libraries, you should inquire if there is that code that you are looking for before starting your project because it will save you time.
A library is like a toolbox for a related set of tasks. You just have to include the tool boxes that contain those tools that you need in your project.
For example, included in the Arduino development environment is the “Wire” library. Wire is a toolbox full of tools for I2C serial communications. Wire tool automate most tasks related to I2C communications. Like everything else, Libraries have different points of view, you could write code to do everything related to I2C yourself, which is definitely worth doing for the learning experience you will have and for deepening and strengthening solid concepts, but you can also Accelerate the development of your project that includes I2C communications if you learn to effectively use the Wire Library.
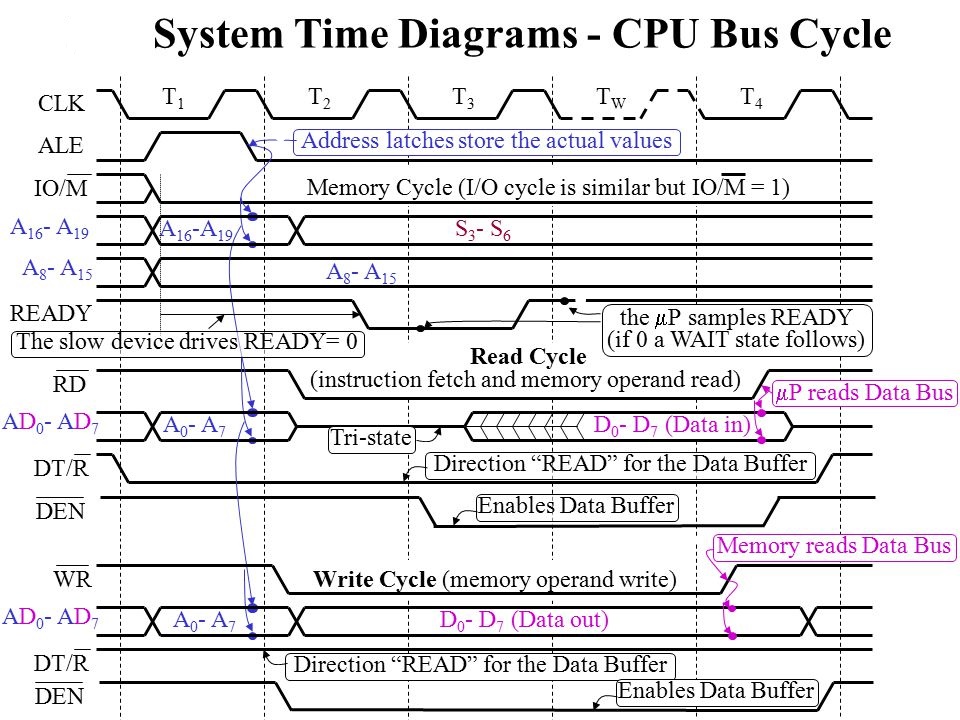
8. Learn the basics about serial ports and about parallel communication
Learning about parallel communication and especially a lot about serial communication is very good advice. Look for what the acronym UART means, in what cases it is used, etc. Search on SPI and I2C. Atmel, now Microchip, are the ones who produce the microcontrollers that are the heart of many of the Arduino cards, they have some very useful application notes on the subject of SPI and I2C communications. Most of the sensors, modules and other accessories you will use will communicate with your Arduino through an SPI or I2C serial connection. Learning these communication techniques will make it much easier to use these sensors, modules and accessories.
Tip: For projects, be careful with accessories, such as screens, that require parallel communication. Parallel COM ports use a large number of pins compared to serial COM ports. You might discover that your Arduino does not have enough pins or pins for it, and if you do, you can end up using so many pins that you will not have for anything else. If you have just learned to control a parallel communication LCD, then you want to use it with other devices, but devices like this can have too many I / O (Inputs / Outputs) for projects that involve several devices, then you should analyze, for example how to reduce the number of I / O or how to expand them.
9. Do not forget the memory limits
Most people who start do so with one of the basic cards like UNO. Indeed there are several types of memory on any type of Arduino card, but here we will focus on RAM. Eventually, we will fill the memory and we will take the RAM memory to the limit. Reaching this limit is good news. The previous sentence may sound ridiculous, but let us explain it so you can qualify or disqualify it.
Inevitably, beginner and experienced programmers alike are messy, spreading the code in such a way that it takes more resources than necessary. There are almost always ways to strengthen the code. The goal is to make it as compact as possible, and really make the most of the resources you have. Until you encounter a barrier, why would you stop to investigate this? Reaching the RAM limit forces you to be smart. It forces you to reexamine what you have already done and look for ways to improve it.
Eventually, you may have to get a card with more RAM and more program memory or Flash or more EEPROM memory, but do not rush.
Tip: Here is a small suggestion to start: If you find that you are running out of RAM, try this trick to read text strings directly from the program’s memory instead of from RAM:
Serial.println (F (“your text here”));
The macro F inserted here between the parentheses prevents the text from being loaded into the RAM at the beginning of the program. Thus the text string will be read directly from the flash memory/program when necessary.
10. Not all Arduino cards have native USB
We know that this statement does not make sense at first sight. You could point out that you can program your Arduino, which has a USB port, by plugging it into the USB port of your computer. This is correct, but for some Arduino cards, there are some very intelligent software pirouettes that go behind the scenes and are transparent to users.
Most microcontrollers do not handle USB communications innately. To avoid this we have two ways:
- The first common solution is to place a separate chip on the board to handle USB communication as on the Arduino UNO board. This chip also converts the USB communication data in a way that is understandable by the UART of the main microcontroller.
- This method involves a separate piece of hardware or hardware module that connects to the microcontroller when you want to communicate this via USB, for example, the USB to Serial TTL Adapter CP2102.
In summary, if you intend to use the USB port of your Arduino to connect to a computer, a camera or a USB drive, make sure that the card you purchase has a USB driver included. Or, you could add this USB capability with an additional module.
Arduino has proven to be a great learning environment for anyone, novice or engineer, who wants to code and apply an electronic system. It’s fun and useful, and with the right information and approach, it can be a pleasant learning process. But remember “Be patient with yourself”.
Also Read: How to Configure Raspberry Pi as Network Ad-Blocker


